Raised Concrete Garden Bed
Project Overview
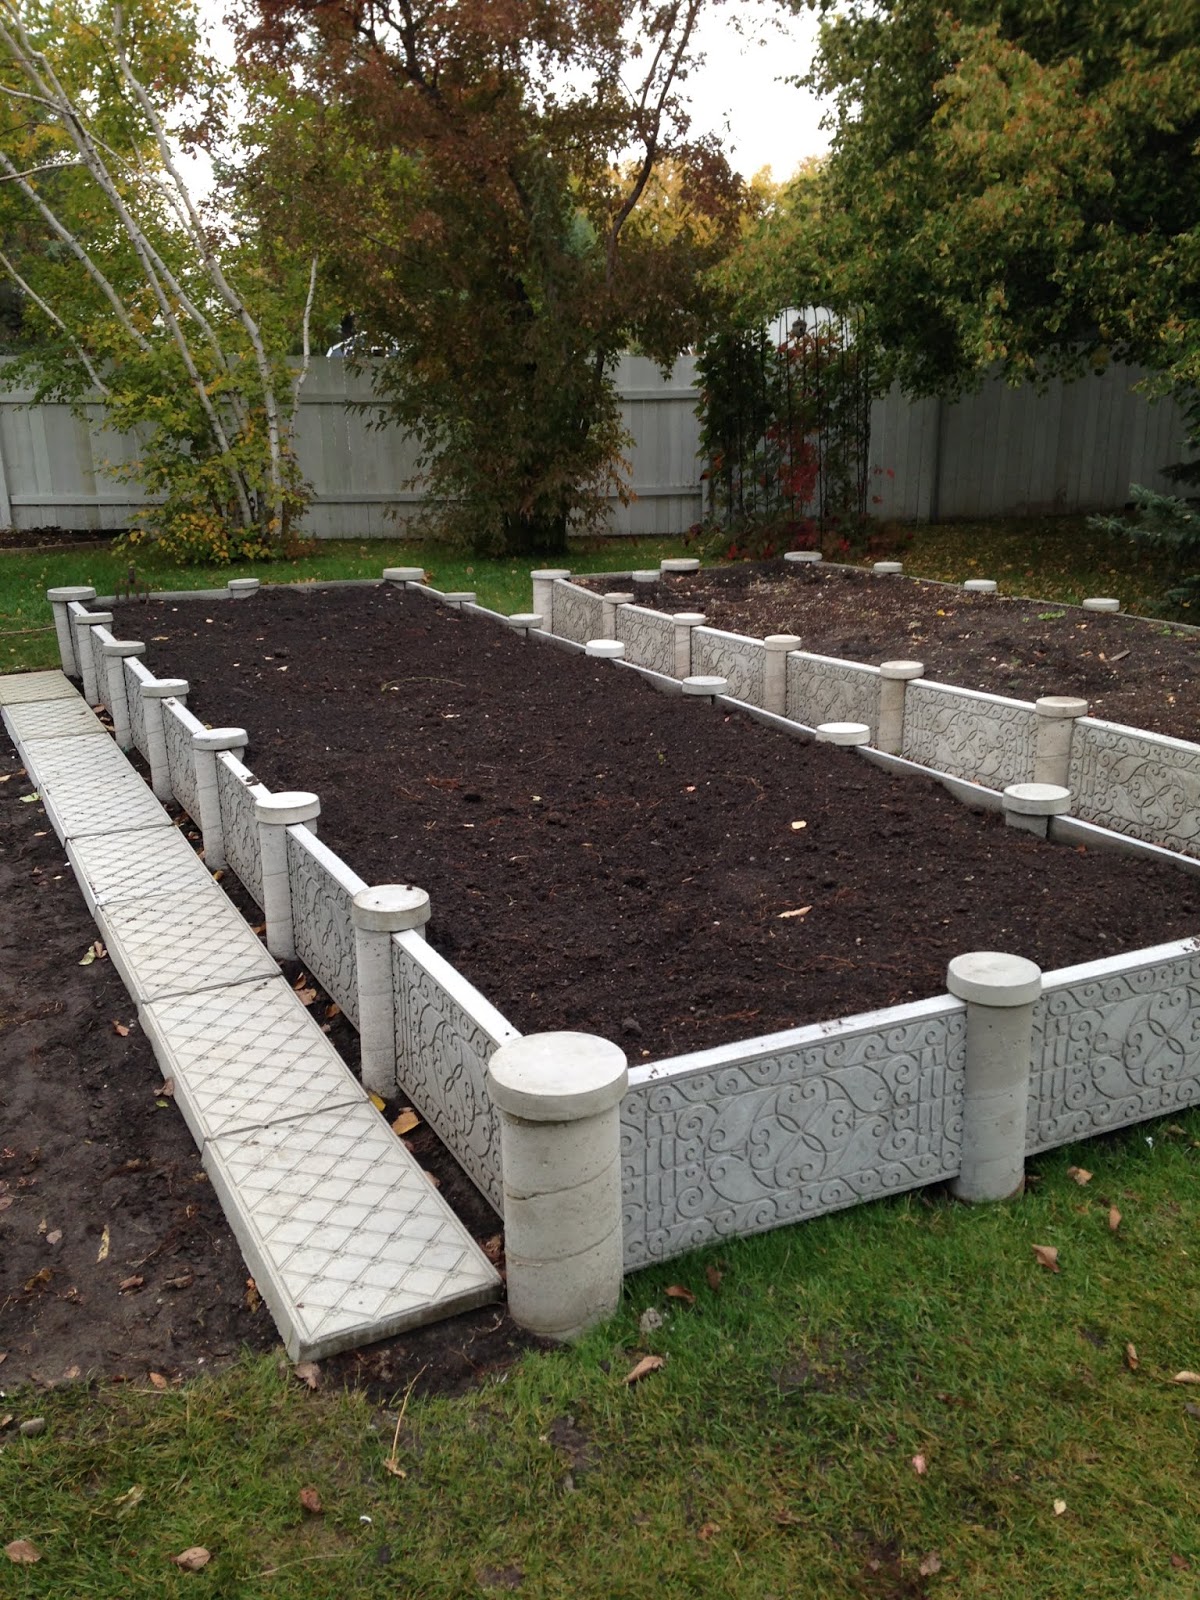
The concrete raised garden bed was designed to allow ease of access, space utilization, durability & be environmentally friendly. The bed replaced an existing bed made with railway ties. We did not like the tar that was present on the ties. We felt the concrete would be healthier and more durable. The 132sqft bed measures 22’ long X 6’ wide X 16” high. The total construction cost was $600 and it took 2 weeks to build. The bed height & width easily gave my wife and I access to the planting area. The concrete moulds for the side panels & side walk were “Rubbermaid” boot pans purchased at a local hardware store. The pans were an ideal size and were very durable. The post moulds were 8’ concrete piling tubes cut to 32” lengths. The posts were dug into the ground 16” and 16” was above grade to accommodate the panel section width. The Styrofoam strips 16”x 2 ¼” were fastened inside the tubes using 1 ½” deck screws.
The strips were removed once the concrete was set. The post grooves accommodated the panel sections to hold them in place. The post tops were made using pails to match the post diameter & had slight over hang. 2” of concrete is put in the pail and tapped to remove air bubbles. We basically used left over concrete to make the tops when we poured the panels, so there virtually wasn’t any waste after each mixing session. The caps rest on the posts and are not glued or cemented in place. The floating bed allows it to move with the frost. The first bed we built went through two winters without any damage or cracking. The 100lb finished panels were lowered into place using rope loops for handles. The first concrete bed we constructed was mixed in a wheel barrow using a hoe. A cement mixer for my birthday made this second project much easier.
Inside dimensions 16” x 34” x 2”
Retail price $13.00 each
Boot tray has a classic inside pattern design


Design has 8” wide tubes on the corner posts & 6” wide tubes on the side posts


Boot Tray
Purchased 3 boot trays from a hardware storeInside dimensions 16” x 34” x 2”
Retail price $13.00 each
Boot tray has a classic inside pattern design


Concrete Quik-Tubes
Garden bed is constructed with concrete posts.Design has 8” wide tubes on the corner posts & 6” wide tubes on the side posts

Quik-Tube Length
Tubes are cut 32” long
Styrofoam Strips
 |
| Cut 2” Styrofoam in strips 2 ¼ ” wide. |
 |
| 2 foam strips 2 ¼”w X 16”L X 2” for each concrete post |
 |
| 2 -16” foam strips are attached with 1 ½" screws to the inside of the tubes |
 |
| Strips in place flush with the top of the tube 6” Side post design |
 |
| 8” Corner post design |
Site Setup
The initial site setup should include a site string line and grade level.Measure and mark where the posts are to be located.
A good plan of attack may be to get a line locate
from your utility providers just to be sure.
***(Posts are only in the ground 16”).
The first post hole can now be dug and the tube put in place and leveled.

Setting Up The Posts
Quick-Tubes are dug in place 16”deep.Be sure tubes are in a straight line and level.


 |
| The posts are in place ready to pour the concrete. |
Concrete Mixing
3500psi Redi-crete cement mix was used to make the concrete posts.Each side post require 1 X 30 kg bag
Corner posts require 1 ½ X 30 kg bags
1 - 36” X 3/8” rebar was also placed down the centre of the tubes for extra strength.

Pour the concrete

Styrofoam Strips
**Remove the paper Quik-tube forms & Styrofoam Strips after 72 hrs.**
 |
| Post with strip removed |
Concrete Mixing
6000 psi Redi-Crete concrete mixed for panels.1 ½ x 25 kg bag required per panel Concrete Reinforcing Wire
Include reinforcing wire to ensure stronger finished panel strength.

Vibrating Table
I made this vibrating table. Two ¾” pieces of plywood 30” square bolted to a 15” tire. I mounted a ¼ hp electric motor to the bottom of the plywood. A 4” pulley with a weighted offset is mounted on the motor shaft to make the motor & platform vibrate. Electric switch added for operator convenience. |
| Vibrating table helps remove air bubbles from concrete panel moulds |
 |
| Works great! |
Concrete Panels
Spray panel moulds with a release agent like non stick cooking oil sprayConcrete panels need to cure at least 2 days before removing them from the moulds
Cover the moulds with damp cloths to allow for a slower concrete cure / setup time

Panels are set in place between the concrete posts.
Tie ropes loops around the panel to assist lowering them in place.
Panels weigh 100 lbs so you may want a buddy to help.

6” caps are made by putting 2” of concrete in the bottom of a gallon pail.
Spray the inside bottom of a pail with cooking oil.
Add concrete.
Tap to remove air bubbles.
Remove concrete cap from pail in 2 days.
Set cap on top of your posts.

Concrete Panel
 |
| Concrete panel removed from the mould |
Tie ropes loops around the panel to assist lowering them in place.
Panels weigh 100 lbs so you may want a buddy to help.

Concrete Post Caps
8” Caps are made by putting 2” of concrete in the bottom of a 5 gallon pail6” caps are made by putting 2” of concrete in the bottom of a gallon pail.
Spray the inside bottom of a pail with cooking oil.
Add concrete.
Tap to remove air bubbles.
Remove concrete cap from pail in 2 days.
Set cap on top of your posts.

 |
| Corner post prior to cap placement |
Sidewalk Added
Different mould pan was used
Completed Garden Bed

 |
| Garden planted! |


Absolutely brilliant! I assume you published all of this so that we can steal your ideas and claim they are our own? (Nope. I give credit ;->. The work itself is worth some bragging rights!)
ReplyDeleteThanks so much, at 72 yo, I'm not so sure I'm up to the task, but concrete, besides being heavy, is way fun to work with and I have a killer cement mixer!
Fair Winds and Following Seas,
Cap'n Jan
(My other vehicle is a catamaran sailboat)
Your raised concrete planter project is amazing! Your inginuity, talent and skill are over the top! The tutorial was expertly written and very easy to understand. I want to truly thank you for sharing! I nominate you for the "Best All-around Garden Project for 2022" 🥳
ReplyDelete